Installing Gogs on FreeNAS
Instructions on how to set up your own self-hosted GitHub clone.
Overview
If you've been working with GitHub or Bitbucket for a while, or if you are using local Git repositories to manage your projects, you may have thought about hosting web-based Git service on your own network. One option that is often recommended is GitLab, but it is heavy-weight, can be difficult to maintain, and includes many features that you may not need.
A much more efficient and light-weight alternative that we'll look at in this article is Gogs. It is a GitHub clone written in Go that runs on all platforms that Go supports. Gogs has been around for a while and is very usable and stable. It comes with an embedded SQLite3 database, but also supports other database drivers if desired.
Prerequisites
This article assumes that you already have a FreeNAS system up and running, but the installation can also be adapted to regular FreeBSD systems. To keep things simple for beginners, most steps will be performed in the FreeNAS web GUI. Advanced users should have no difficulty performing the same steps from the command line, however.
Jail Setup
We'll be running Gogs inside a jail in order to isolate it from the rest of the system. Before installing Gogs itself, we will create a new jail and provide it with a dataset for storing the Git repositories.
Creating the Jail
Adding a new jail is pretty straighforward via the web GUI:
- Go to Jails → Add Jail
- For the Jail Name enter: gogs
- Configure any network settings, or leave the defaults for DHCP
- Click OK to create the Jail
Adding Storage
The Git repositories that you and your users create in Gogs are stored inside the Jail by default. This is not ideal because jails may have to be reinstalled or recreated for all kinds of reasons. It is more convenient to keep the data storage separate from the jail. We are going to create a new dataset in the FreeNAS storage pool and mount it into the jail instead.
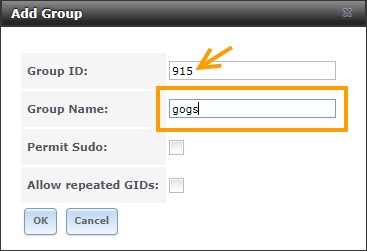
First, create a new user group that will have access to the dataset. We will later add this same group inside the jail:
- Go to Account
- Click on Add Group
- Write down the Group ID (mine happens to be 915)
- For the Group Name enter: gogs
- Click OK to create the group.
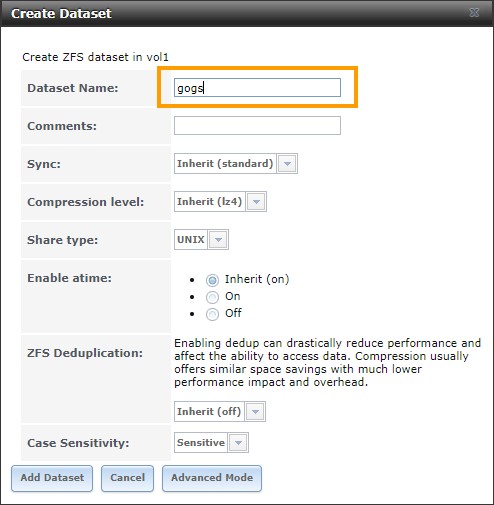
Next, create a new dataset for Gogs storage in the web GUI:
- Go to Storage → Volumes
- Select the pool and volume in which to store the dataset, i.e. vol1/vol1
- Click the Create Dataset button in the bottom toolbar
- Enter a Dataset Name, i.e. gogs
- Leave the other defaults and click Add Dataset to create the dataset.
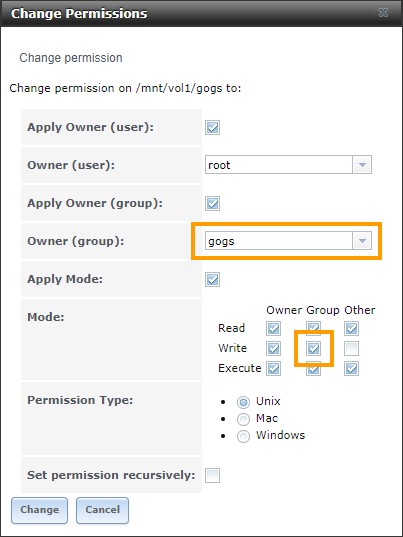
Now assign write permissions to the gogs group on the dataset:
- Select the new gogs dataset
- Click the Change Permissions button in the bottom toolbar
- Change Owner (group) to: gogs
- Check the Apply Mode checkbox
- Check the Mode checkbox for Group and Write.
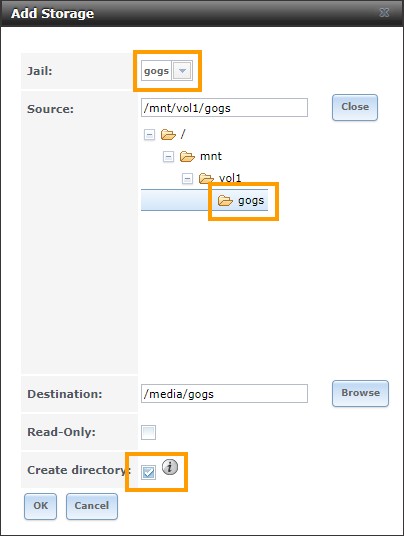
Finally, mount the new dataset into the Gogs jail:
- Go to Jails → Storage
- Click the Add Storage button
- In Jail, select the gogs jail
- In Source, browse to the dataset location, i.e. /mnt/vol1/gogs
- In Destination, type in the path under which the jail should see the mounted dataset, i.e. /media/gogs
- Enable the Create Directory checkbox
- Click OK to add the storage.
The gogs dataset should now be available inside the jail under the destination path that you entered, i.e. /media/gogs.
Updating Jail Packages
Now that the jail is ready, we will log into it and update its packages. The easiest way to open a shell is via the FreeNAS web GUI:
- Go to Jails
- Select the gogs jail
- Click the Shell button in the bottom toolbar.
Now download and upgrade all packages:
# pkg update && pkg upgradeYou might also want to give your jail a different hostname, for example:
# hostname gogs.localLeave the jail's shell open - the next steps will all be executed in there!
Installation
We are now ready to install Gogs, and there a two simple ways to do this: from prebuilt binaries in the ports collection, and from GitHub source code. I tested both and will detail them in the following sections.
Installing From Ports
The easiest way to install Gogs on FreeNAS and FreeBSD is to use the prebuilt binary package that was recently added to FreshPorts:
# pkg install gogsThis installs gogs into /usr/local/libexec/gogs, and the Gogs sub-folders are symlinked as follows:
- custom → /usr/local/etc/gogs
- data → /var/db/gogs/data
- log → /var/log/gogs
The custom application configuration file is located at /usr/local/etc/gogs/conf/app.ini
The package automatically creates a git user under which Gogs will run. Let's duplicate the gogs group from the FreeNAS host and add this user to it, so that it has write access to the mounted repository directory. The group ID must be the same as before:
# pw groupadd gogs -g 916
# pw usermod git -G gogs
The ports package patches the Gogs install web site, so that certain settings cannot be modified. The expectation is that advanced users will modify these directly in the application configuration file.
The repository directory is configured to be in /var/db/gogs/repositories by default. Point it to the mounted dataset instead:
# sed -i .orig 's|^ROOT = .*|ROOT = /media/gogs|' /usr/local/etc/gogs/conf/app.iniIf you'd like to keep the user database, metadata, file attachments, user sessions, or log files in the storage dataset as well, take a look at the configuration file and modify the relevant paths as desired.
Gogs requires the SSH daemon to be running, so enable and start it now:
# sysrc sshd_enable="YES"
# service sshd start
Lastly, enable and start the Gogs service:
# sysrc gogs_enable="YES"
# service gogs start
Future versions of the package can be installed via the package manager:
# pkg update && pkg upgrade -yInstalling From Source
If you don't want to wait for FreeNAS ports and run the very latest version of Gogs, you can also compile it directly from the source code on GitHub. This method is more involved and requires the following steps:
- Enabling SSH daemon and configuring root login
- Installing Git, Go compiler, and optional packages
- Creating a Git user
- Cloning of the Gogs repository on GitHub
- Compilation of the source code with the correct tags
- Enabling and starting of the Gogs service
Luckily, Jed Frey already wrote a shell script to perform all these for you. Unlike the ports package, it also includes memcached and redis. The README is slightly outdated, but the script still works using:
# cd /tmp
# fetch --no-verify-peer https://raw.githubusercontent.com/jed-frey/FreeNAS-Gogs/master/gogs-root.sh
# fetch --no-verify-peer https://raw.githubusercontent.com/jed-frey/FreeNAS-Gogs/master/gogs-compile.sh
# chmod +x gogs*
# ./gogs-root.sh
This installs Gogs into /usr/home/git/gogs.
The script doesn't create a custom application configuration file; it must be created manually. You can either start with an empty file and only add the settings you want to override, or copy the default configuration file to /usr/home/git/gogs/custom/conf/app.ini:
# mkdir -p /usr/home/git/gogs/custom/conf
# cp /usr/home/git/gogs/conf/app.ini /usr/home/git/gogs/custom/conf/
The script automatically creates a git user under which Gogs will run. Let's duplicate the gogs group from the FreeNAS host and add this user to it, so that it has write access to the mounted repository directory. The group ID must be the same as before:
# pw groupadd gogs -g 916
# pw usermod git -G gogs
The repository directory points to /usr/home/git/gogs-repositories by default, but can be configured via the web interface later.
The Gogs service is enabled and started automatically when the installation is complete. Simply run the shell script again to update Gogs in the future:
# ./gogs-root.shConfiguration
Gogs is now up and running, but has to be configured in a web browser for first-time use. By default, the service is using HTTP port 3000. Point your web browser to the Gogs server to open the first-run web setup page. Mine happens to run on 192.168.1.149:3000, but yours may differ.
You should now be greeted with the following page:
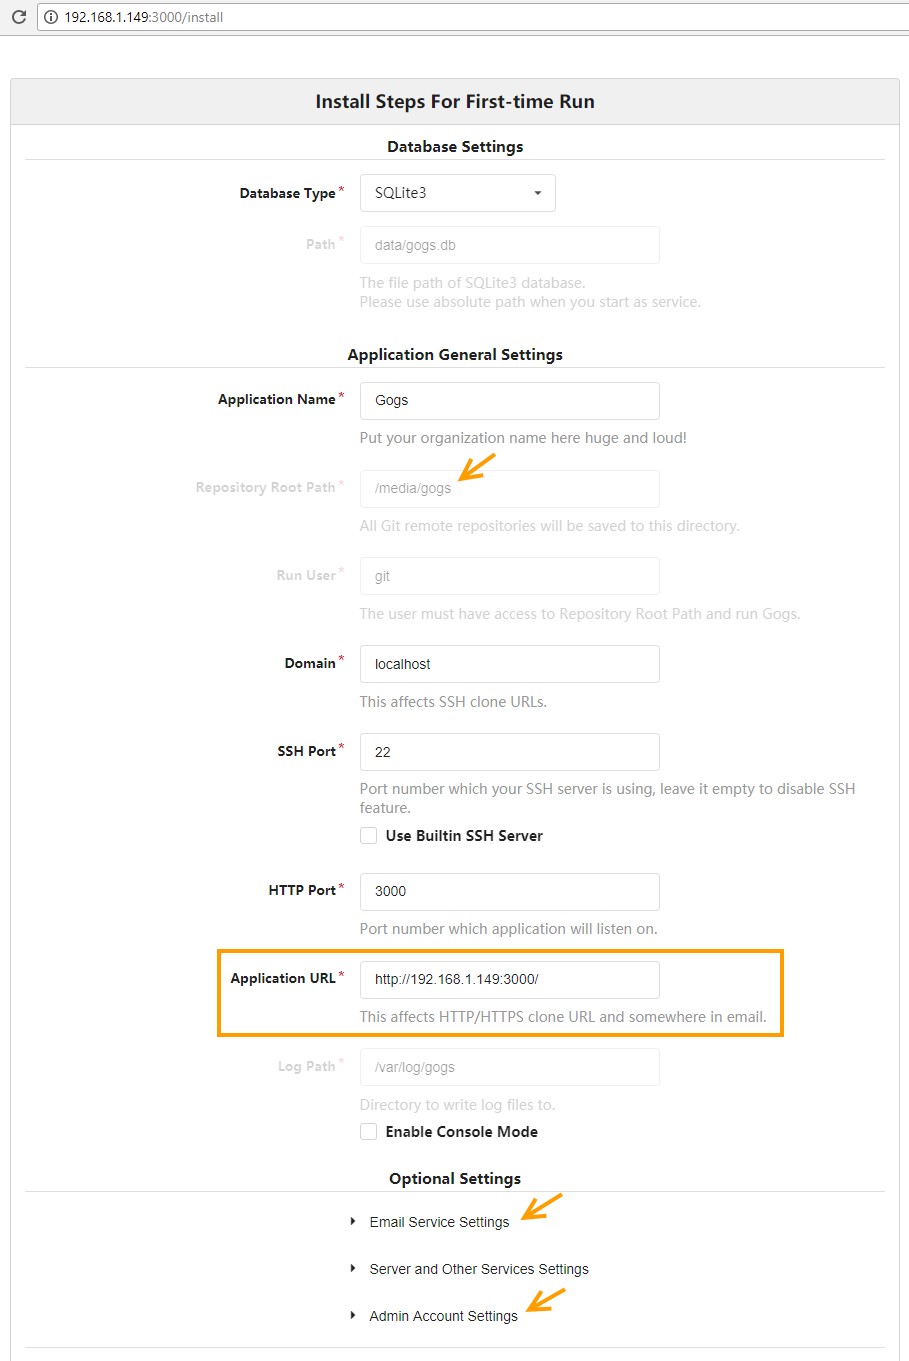
Database & General Settings
Database Type must be SQLite3, unless you compiled from source with options for a different database system (which then has to be installed separately).
Path is where Gogs stores its internal database. IF you installed from source, you'll be able to point it elsewhere, i.e. /media/gogs/data.
Repository Root Path should be a folder inside your mounted dataset, i.e. /media/gogs. If you installed Gogs via the ports package, this should already be set and will be read-only. If you installed from source, you can change this setting now.
Application URL is the URL that Gogs will use for all its internal links. It should point to your Gogs server, i.e. http://192.168.1.149:3000/. If your jail has a network name or domain name, you can enter that instead, i.e. http://gogs:3000 or http://mygogsserver.com:3000
Log Path points to /var/log/gogs by default. If you installed from source, you'll be able to point it elsewhere, i.e. /media/gogs/log
Email Service Settings
If you have an outgoing email server, you can configure the Email Service that will send out email notifications to the administrators and users in case of problems, account changes, or repository udpdates:
SMTP Host is the IP/domain and port number of your outgoing email server. Note that SSL connections are supported by specifying an SSL port, i.e. myemailserver.com:465. For unsecured connections use port 25 instead. Your mail server may require different port numbers.
From is the From field used for sent emails, i.e. gogs@mygogsserver.com or Gogs <gogs@mygogserver.com>
Sender Email is the email address to log into your outgoing email server
Sender Password is the password to log into your outgoing email server
Admin Account Settings
You may also configure the administrator account under Admin Account Settings at this point, but note that you can always add users later. If you do set up an administrator now, the first user created later will automatically receive administrative rights in Gogs.
Username is the name of the user. Note that admin is reserved by Gogs and cannot be used. Enter your personal user name instead, i.e. johndoe.
Password and Confirm Password is the user account password
Admin Email is the user's email, i.e. johndoe@gmail.com
Appendix A: Enabling HTTPS
HTTPS can be enabled for the Gogs server by adding an SSL certificate and updating the corresponding settings in the application configuration file. The Gogs FAQ provides a quick overview. If your server is public facing, you may want to consider putting it behind a reverse proxy, such as Nginx.
To get things up and running quickly, you can also use a self-signed certificate. Change your working directory to the Gogs installation directory and execute:
# ./gogs cert -ca=true -duration=8760h0m0s -host=192.168.1.149
 2018/05/20 09:47:20 Written cert.pem
 2018/05/20 09:47:20 Written key.pem
# chown git:git *.pem
If you move the generated certificate files or import an existing certificate into /media/gogs, for example, the corresponding application configuration would be:
PROTOCOL = https
ROOT_URL = https://192.168.1.149:3000
CERT_FILE = /media/gogs/cert.pem
KEY_FILE = /media/gogs/key.pem Appendix B: Troubleshooting
If the web site is not reachable after you modified the custom application configuration file, chances are that the service terminated right away with an error. This can happen easily if there is a typo or a permission problem.
The Grogs log file may provide a clue. If you installed the ports package, it is located at /var/log/gogs/gogs.log. If you installed from source, it will be in /usr/home/git/gogs/log/gogs.log.
For other issues, check the official troubleshooting page.