Recovering FreeNAS Configuration from ZFS Boot Drive
This article explains how to rescue a FreeNAS server with failed USB boot media and provides details on how to read files from ZFS volumes.
Overview
Just in time for the holiday break I had to deal with a FreeNAS server that failed to boot due to a defective USB boot drive. The drive started failing during a recent FreeNAS update. Of course, this happened after a number of configuration changes were made to the server and before any backup took place. To make matters worse, the server was located four thousand miles away with nobody nearby to repair or reinstall it on-site.
As a result, I had a not so welcome, but appreciated opportunity to learn about the inner workings of FreeNAS, and was able to prepare new USB boot media that successfully restored the server. For the benefit of others who may end up in similar situations, I am documenting my findings below.
Prerequisites
It is assumed that you are still able to read data off the drive containing the ZFS boot volume. You shouldn’t work directly on that drive, because it may damage it further and result in a complete data loss. Clone the drive to a second USB drive and work on that copy instead. This can be accomplished with the dd command on Linux and BSD based operating systems, and tools like Win32DiskImager on Windows.
I was able to restore my FreeNAS server without having to deal with the ZFS file system on the boot drive. You can skip to the very last section of this article if you’d like to try this automatic upgrade process. For everyone else and for future reference, I will include instructions on how to manually read files off the boot drive in the following paragraphs.
Accessing ZFS File Systems
The easiest way to read ZFS volumes is via FreeBSD, because it has ZFS support out of the box. It is also possible in Linux, but requires extra work, such as installing a kernel module. Windows does not have any ZFS support at this time and may not get it anytime soon.
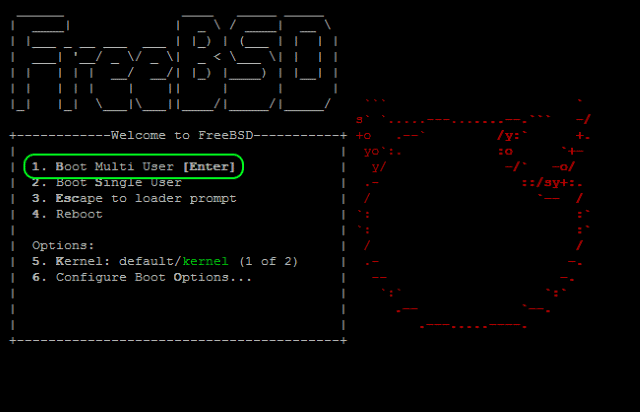
If you do not have a working FreeBSD installation, you can download the latest image, burn it to a DVD or USB drive, and boot it in LiveCD mode:
- Boot the DVD or USB drive
- Select the Multi User boot option (default)
- Log in as root (no password)

Mounting the ZFS Volume
Remove all USB drives from your computer in order to avoid getting confused about which one is which. Insert the cloned USB drive. The USB mass storage driver should recognize it and add it to the device list as da0.
Now use the zpool command to discover ZFS pools on the drive. Zpool will automatically search all connected drives for available pools:
#root@:~ # zpool import

   pool: freenas-boot
     id: 14146660498451047920
  state: ONLINE
 status: Some supported features are not enabled on the pool.
 action: The pool can be imported using its name or numeric identifier, though
    some features will not be available without an explicit 'zpool upgrade'.
 config:

    freenas-boot                                  ONLINE
      gptid/ccf6dd10-02b9-11e5-b2fb-00262d01f580  ONLINE
The pool on FreeNAS boot devices is called freenas-boot. By default, the mount points of the relevant datasets are set to the root directory, which is not what you want when mounting them into our LiveCD system. Import the pool with the mount points pointing to a temporary directory instead:
#root@:~ # mkdir /tmp/freenas
#root@:~ # zpool import -R /tmp/freenas freenas-boot

   pool: freenas-boot
     id: 14146660498451047920
  state: ONLINE
 status: Some supported features are not enabled on the pool.
 action: The pool can be imported using its name or numeric identifier, though
    some features will not be available without an explicit 'zpool upgrade'.
 config:

    freenas-boot                                  ONLINE
      gptid/ccf6dd10-02b9-11e5-b2fb-00262d01f580  ONLINE
Unless you exported the pool on the FreeNAS server with zpool export, which is almost certainly not the case if the server does not boot anymore, the pool will already be marked as imported and online, so we use the -f option to force reimporting the pool into the LiveCD environment. The -R option is equivalent to f -o altroot= and sets the desired root mountpoint.
Let’s take a look at the pool’s status:
#root@:~ # zpool status -v

  pool: freenas-boot
 state: ONLINE
status: One or more devices has experienced an error resulting in data
    corruption.  Applications may be affected.
action: Restore the file in question if possible.  Otherwise restore the
    entire pool from backup.
   see: http://illumos.org/msg/ZFS-8000-8A
  scan: scrub repaired 0 in 1334h34m with 22 errors on Wed Dec 30 17:19:33 2015
config:

    NAME                                          STATE     READ WRITE CKSUM
    freenas-boot                                  ONLINE       0     0     0
      gptid/ccf6dd10-02b9-11e5-b2fb-00262d01f580  ONLINE       0     0     0

errors: Permanent errors have been detected in the following files:

        freenas-boot/ROOT/FreeNAS-9.3-STABLE-201509282017@2015-05-25-01:52:04:/boot/kernel/kernel
        freenas-boot/ROOT/FreeNAS-9.3-STABLE-201509282017@2015-09-20-12:48:17:/boot/kernel-debug/geom_vinum.ko
        freenas-boot/ROOT/FreeNAS-9.3-STABLE-201509282017@2015-09-20-12:48:17:/boot/kernel-debug/ispfw.ko
        freenas-boot/ROOT/FreeNAS-9.3-STABLE-201509282017@2015-09-20-12:48:17:/boot/kernel-debug/kernel
        freenas-boot/ROOT/FreeNAS-9.3-STABLE-201509282017@2015-10-06-05:19:55:/boot/kernel/kernel
In my case it looks like the kernel and some other files in various snapshots are corrupted, but luckily the pool’s datasets are still intact and can be mounted. The zfs list command will output a list of all available datasets:
#root@:~ # zfs list

NAME                                                USED  AVAIL  REFER  MOUNTPOINT
freenas-boot                                       1.71G  12.8G    31K  none
freenas-boot/ROOT                                  1.67G  12.8G    25K  none
freenas-boot/ROOT/FreeNAS-9.3-STABLE-201508250051  4.46M  12.8G   515M  /tmp/freenas
freenas-boot/ROOT/FreeNAS-9.3-STABLE-201509160044  5.55M  12.8G   517M  /tmp/freenas
freenas-boot/ROOT/FreeNAS-9.3-STABLE-201509282017  1.66G  12.8G   517M  /tmp/freenas
freenas-boot/ROOT/Initial-Install                     1K  12.8G   507M  legacy
freenas-boot/ROOT/Wizard-2015-05-25_05:05:54          1K  12.8G   507M  legacy
freenas-boot/ROOT/Wizard-2015-05-25_05:27:47          1K  12.8G   507M  legacy
freenas-boot/ROOT/default                           504K  12.8G   508M  legacy
freenas-boot/grub                                  27.2M  12.8G  6.80M  legacy
Note that the mountpoint property of mountable datasets are now pointing to /tmp/freenas instead of the root directory. To see all properties of the datasets (or a particular dataset) you can run the zfs get command:
#root@:~ # zfs get all
#root@:~ # zfs get all freenas-boot/ROOT/FreeNAS-9.3-STABLE-201509282017
So far we only imported the pool and haven’t mounted any datasets yet. The freenas-boot/ROOT/FreeNAS-9.3-STABLE-201509282017 dataset is what I am interested in, because it contains the main FreeNAS installation along with its configuration database. Depending on which version of FreeNAS you have installed, the name of your dataset may be slightly different.
Let’s mount the dataset and make its files available in /tmp/freenas:
#root@:~ # mkdir /tmp/freenas
#root@:~ # zfs mount freenas-boot/ROOT/FreeNAS-9.3-STABLE-201509282017
#root@:~ # ls /tmp/freenas

.cshrc     .profile    .rnd           COPYRIGHT    bin
boot       cfg         conf           data         dev
entropy    etc         home           lib          libexec
media      mnt         nonexistent    proc         rescue
root       sbin        sys            tmp          usr
var
Restoring the FreeNAS Server
At this point it may be tempting to mount any affected datasets and simply restore the corrupt files from the FreeNAS installer, but this is not ideal. On the one hand, repairing a broken ZFS file system is not straightforward, and there is no good mechanism to clear permanent errors from ZFS snapshots. The general process is to create a new pool and then migrate the old pool’s datasets to the new pool via zpool send/receive. On the other hand, with a dieing drive you never know what else might be broken, and you probably don’t want to take any chances.
FreeNAS offers two great alternatives. The naive solution is to install a fresh copy of FreeNAS on a new USB stick and import the old configuration via the web GUI. The configuration database is located in /data/freenas-v1.db. Copying it from the mounted dataset to a different drive is straightforward. In the following example I used a spare USB stick that happened to be formatted with an EXT3 file system:
#root@:~ # mkdir /tmp/transfer
#root@:~ # mount -t ext2fs /dev/da1s1 /tmp/transfer
#root@:~ # cp -R /tmp/freenas/data /tmp/transfer/
#root@:~ # umount /tmp/transfer
Besides reimporting the configuration database there is an even simpler solution, and this is the one I would ultimately recommend, because no files need to be backed up, and no extra USB drive is required: the FreeNAS installer has an option to upgrade an existing installation. It can perform this in place with the backup USB drive containing the damaged copy of the original boot drive. It will also retain the old configuration database:
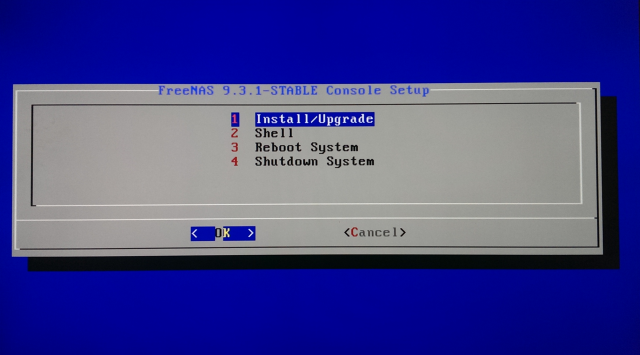
- Download the FreeNAS ISO, burn it to a CD or USB drive, and boot it
- In the boot menu, chose Install/Upgrade
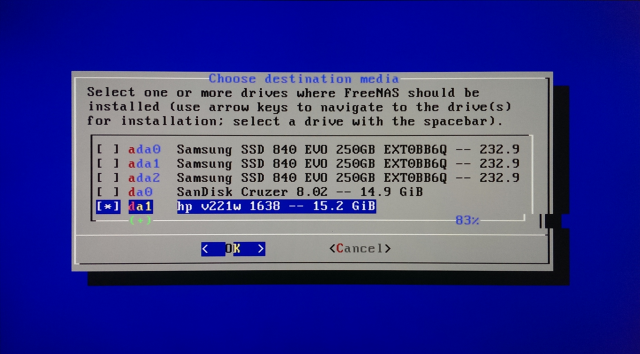
- In the destination media menu, select the drive containing the copy of the damaged boot image
- Click OK. The installer will offer you to upgrade instead of reinstall, and to keep the original configuration
The installer will make a copy of the configuration database, then wipe the file system and reinstall FreeNAS, and finally restore the database on the drive. The drive is now ready to be used in the server. When booting it for the first time, FreeNAS will migrate the database to the installed version. After that, your system should be up and running, and all settings, including user accounts, network shares, plug-ins and jails should be working again.

FreeNAS is able to migrate earlier database versions to newer ones during the upgrade process, but in order to avoid any complications, it may be best to "upgrade" FreeNAS to the same version as before, and then upgrade to a newer version via the web GUI after the system is up and running again.
Related Resources
- zpool Administration (FreeBSD Handbook)
- Using ZFS Alternate Root Pools (Oracle Documentation)
- GUI Broken, CLI configuration backup needed (FreeNAS Forums)
- How to repair corrupted ZFS file systems? (Oracle Community Forums)
- Installing the FreeNAS Image Directly to a USB Drive (Sam Kear’s blog)
- Working on a Geli-Encrypted ZFS Pool from a Live-CD or Memstick (To Be Announced blog)