Adding New Asset Types to UE4
Adding custom asset types is an important, yet underused feature in Unreal Engine 4. This article shows how to accomplish this task and offers some deeper insights into the various APIs.
Tags: plugins programming ue4
Overview
Almost everything you interact with in Unreal Engine 4 is some type of content asset that can be created, imported, organized, viewed, and edited in the Content Browser. The Engine includes a large number of asset types out of the box. That doesn’t mean that you wouldn’t want to add your own. The asset types shipping with UE4 were designed for wide applicability, but at some point your game might benefit from introducing custom assets tailored to your project’s specific needs.
Adding new asset types requires programming and, depending on how ambitious you are, can become quite involved. The basic steps to get up and running are pretty straightforward though and always follow the same pattern. In this article I will try to convince you that this is not some black magic art mastered only by a chosen few, but a simple process that can be copied even by less seasoned programmers.
Adding a new asset type and making it available to content creators generally consists of the following tasks:
- Declaring the asset type’s C++ class
- Implementing factories for the asset type
- Customizing the asset’s appearance in the Editor
- Adding asset-specific Content Browser actions
- Bundling everything into a plug-in
For more complex asset types you may also want to create your own asset editor user interface or implement additional features, such as automatic asset reimport. This is something we may explore in a future article.
Prerequisites
This tutorial is aimed at developers who have at least some experience with C++ programming in Unreal Engine 4. You will need Visual Studio and either a C++ code project or the full UE4 source code from GitHub. If you are new to programming in UE4, please see the official Programming Guide!
In the following paragraphs we will discuss the creation of a new asset type, TextAsset, which can be used to store personal notes or other text strings in the Editor. It was inspired by a tweet and is a simple, yet interesting example to highlight the most important points. The full source code of the plug-in can be found in the corresponding GitHub repository.
Declaring Asset Types
The first step is, of course, the implementation of the new asset type itself. This is actually the easiest part as most assets will simply be a container for one or more properties and not contain any behavior. The UTextAsset simply stores a string, so its entire declaration amounts to:
UCLASS(BlueprintType, hidecategories=(Object))
class TEXTASSET_API UTextAsset : public UObject
{
    GENERATED_BODY()

    UPROPERTY(BlueprintReadOnly, EditAnywhere, Category="TextAsset")
    FText Text;
};
As per UE4 convention, the asset’s class name UTextAsset starts with the letter "U", indicating that it is derived from UObject. All asset types must be UObjects, which provide useful features like serialization (for storing the asset in a package), reflection (for inspecting the asset in the Details Panel or using it with Blueprints), and configuration (for loading default values from an INI file).
Integrating asset types with Blueprints is very easy. The BlueprintType attribute on the class instructs Unreal Build Tool (UBT) to generate the glue code for exposing the UTextAsset type in Blueprints. The BlueprintReadOnly attribute on the Text property is a hint that Blueprints should only be able to read, but not write the text string. EditAnywhere exposes the property as an editable text box in the Details Panel.
The TEXTASSET_API macro in front of the class name indicates that all class methods should be exported in order to make them accessible from other modules. This will become important later when we organize the code into separate modules.
Once assets are instantiated in the Content Browser, their properties can be inspected in the Asset Editor. The Editor will create one for you by default that simply shows a Details Panel. The hidecategories class attribute is a hint to not display any properties inherited from UObject as these would only clutter up the view. The Text property is shown in the "TextAsset" category.

Now that we have declared the new asset type and are ready to display and edit it, we have to provide our users with ways to create new instances of it. This is handled via so called Asset Factories.
Asset Factories
Asset instances are usually created in one of two ways: users can either add them via the Content Browser’s context menu, or drag & drop supported file types from disk into the Content Browser. The logic for this is already built into the Editor. You only need to implement the construction of the asset objects themselves in one or more asset factory classes.
The base class for all asset factories is UFactory, which declares various methods of which we will implement only a few. The Editor’s internal code for asset creation is probably more than 10 years old and cannot handle factories that support both creation and import.
It is therefore customary in the UE4 code base to implement two factory classes per asset: one for creating new assets via the context menu (UXyzFactoryNew), and one for supporting drag & drop (UXyzFactory).
Factory for Context Menu

The class declaration for the context menu factory does not contain any surprises. Two methods, FactoryCreateNew and ShouldShowInMenu, must be implemented in order to support asset creation via the Content Browser:
UCLASS(hidecategories=Object)
class UTextAssetFactoryNew
    : public UFactory
{
    GENERATED_UCLASS_BODY()

    virtual UObject* FactoryCreateNew(UClass* InClass, UObject* InParent, FName InName, EObjectFlags Flags, UObject* Context, FFeedbackContext* Warn) override;
    virtual bool ShouldShowInNewMenu() const override;
};
The implementation of FactoryCreateNew simply constructs a new object, and the method ShouldShowInNewMenu always returns true, because we want the new asset to be listed in the Content Browser’s context menu. A bit of initialization is needed in the constructor in order to tell the Editor what type of factory it is and which class of objects it can create:
SupportedClass = UTextAsset::StaticClass();
bCreateNew = true;
bEditAfterNew = true;
The bEditAfterNew flag causes the associated asset editor window to be opened after the asset has been created by the user.
Factory for Drag & Drop

The factory for supporting drag & drop has an even simpler declaration, because only one method, FactoryCreateBinary needs to be implemented:
UCLASS(hidecategories=Object)
class UTextAssetFactory
    : public UFactory
{
    GENERATED_UCLASS_BODY()

    virtual UObject* FactoryCreateBinary(UClass* Class, UObject* InParent, FName Name, EObjectFlags Flags, UObject* Context, const TCHAR* Type, const uint8*& Buffer, const uint8* BufferEnd, FFeedbackContext* Warn) override;
};
Some more work is needed in its implementation though. The initialization in the constructor is changing slightly. In particular, it is setting up the list of supported file types that can be dropped into the Editor:
Formats.Add(FString(TEXT("txt;")) + NSLOCTEXT("UTextAssetFactory", "FormatTxt", "Text File").ToString());
SupportedClass = UTextAsset::StaticClass();
bCreateNew = false;
bEditorImport = true;
The factory function now also has to perform some actual work in order to read the contents of the dropped text file. First, it is broadcasting an event that it is about to import a file. This allows other parts of the Editor to take additional actions, if desired:
FEditorDelegates::OnAssetPreImport.Broadcast(this, Class, InParent, Name, Type);Next, it is opening the text file, reading its contents and copying them into a newly created TextAsset object, which is then returned to the caller:
if (FFileHelper::LoadFileToString(TextString, *CurrentFilename))
{
    TextAsset = NewObject<UTextAsset>(InParent, Class, Name, Flags);
    TextAsset->Text = FText::FromString(TextString);
}

return TextAsset;We now have a new asset type and two asset factories, and you may be surprised to hear that there is nothing else do be done. The Editor will automatically discover the factories when needed. Now, let’s take a look at how we can expose the asset in more user friendly ways…
Asset Actions
The Editor allows for customizing the appearance of assets, such as the display name, the icon color and thumbnail, asset specific context menu actions, filtering, and categorization. Most of these are implemented via asset actions, i.e. classes implementing the IAssetTypeActions interface.
For the purpose of this tutorial we declare and implement a new class called FTextAssetActions. We will inherit it from FAssetTypeActions_Base, which is a convenience class that provides commonly used default behaviors.
Thumbnail Colors & Display Name
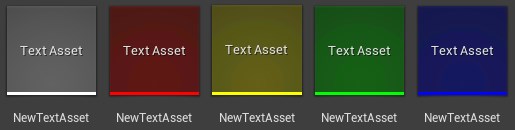
Different asset types can have different colors so that they are more easily distinguished in the Content Browser. We also try to provide good human readable names for asset types. The code required for this is trivial:
FText FTextAssetActions::GetName() const
{
    return NSLOCTEXT("AssetTypeActions", "AssetTypeActions_TextAsset", "Text Asset");
}

FColor FTextAssetActions::GetTypeColor() const
{
    return FColor::White;
}Categorization

The Content Browser uses asset categories to help organize all the different types of assets and make it easier for the users to locate them in the context menu. Putting your asset type into a particular category is easy:
uint32 FTextAssetActions::GetCategories()
{
    return EAssetTypeCategories::Misc;
}
You can also make an asset type available in multiple categories by concatenating the category types with a bit-wise OR. To show it in both the Blueprint and the Miscellaneous category, return the following value:
return EAssetTypeCategories::Blueprint | EAssetTypeCategories::Misc;Context Menu Actions
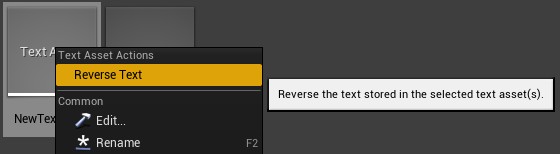
Manipulation of asset instances usually happens in the asset editor, but sometimes it is useful to expose certain asset specific actions in the Content Browser’s context menu. To demonstrate this, the FTextAssetActions class implements an action to reverse a UTextAsset's text string.
Whenever the context menu is activated on an asset, the Editor calls the GetActions method and passes in the selected asset objects and a reference to a menu builder object that can be used to extend the context menu:
void FTextAssetActions::GetActions(const TArray<UObject*>& InObjects, FMenuBuilder& MenuBuilder)
{
    FAssetTypeActions_Base::GetActions(InObjects, MenuBuilder);

    auto TextAssets = GetTypedWeakObjectPtrs<UTextAsset>(InObjects);

    MenuBuilder.AddMenuEntry(
        LOCTEXT("TextAsset_ReverseText", "Reverse Text"),
        LOCTEXT("TextAsset_ReverseTextToolTip", "Reverse the text stored in the selected text asset(s)."),
        FSlateIcon(),
        FUIAction(
            FExecuteAction::CreateLambda([=]{
                for (auto& TextAsset : TextAssets)
                {
                    if (TextAsset.IsValid() && !TextAsset->Text.IsEmpty())
                    {
                        TextAsset->Text = FText::FromString(TextAsset->Text.ToString().Reverse());
                        TextAsset->PostEditChange();
                    }
                }
            }),
            FCanExecuteAction::CreateLambda([=] {
                for (auto& TextAsset : TextAssets)
                {
                    if (TextAsset.IsValid() && !TextAsset->Text.IsEmpty())
                    {
                        return true;
                    }
                }
                return false;
            })
        )
    );
}
We use a few tricks here, so let’s look at those in more detail. Since we are overriding GetActions, it is best practice to call the same method in the base class. Currently, it doesn’t do anything, but that may change.
Next, we are converting the collection of selected objects into a collection of weak pointers. A weak pointer is a pointer to an object that gets nulled out when the referenced object is being destroyed. This is important since in the time between opening the context menu and actually clicking on the menu action it is possible that something else in the Engine is removing the object. In that case, we do not want to dereference a raw pointer to that object, because it would point to invalid memory.
Finally, we are adding a single menu entry to the context menu. This code may look a little scary, but it is really just a single expression wrapped over multiple lines. We are providing name, tool-tip text, and event handlers for the action. We chose not to use a custom icon for it.
The FCanExecuteAction event handler ensures that at least one text asset is valid and not empty, otherwise the menu action will be grayed out. The FExecuteAction handler performs the actual string reversal on each asset and applies the change.
Thumbnails

It is also possible to customize the Content Browser thumbnails of assets. By default, these thumbnails only show a text string with the name of the asset type, but they may contain any Slate UI widget, even 3D viewports.
The TextAsset example doesn’t implement custom thumbnails, because it requires more code that would only add confusion. The implementation is not too difficult, however. If you’re curious about how it’s done, search the UE4 code base for UThumbnailRenderer, which is the base class responsible for rendering custom asset thumbnails.
Building The Plug-in
Everything we discussed so far could be implemented directly in a game module. However, the text asset seems generic enough to be of use in different projects, so the right thing to do is to bundle it up into a reusable plug-in instead.
The Plugins Programming Guide provides a good overview of how plug-ins work and how to create your own, so I won’t go over all the details again. The gist is that plug-ins are really just one or more regular C++ modules along with a .uplugin descriptor file that describes when and where the modules should be loaded by the Engine.
A plug-in can be used in the Editor, in the game, or in both. How many modules does a plug-in have? It depends. Programmers are free to partition plug-ins into as many modules as they like, but they must decide which of the modules are loaded where. Generally, some of the code is needed only in the Editor, and some is shared between Editor and game. It makes sense to split it up accordingly.
The text asset plug-in uses two modules, TextAsset and TextAssetEditor. The former contains only the TextAsset class, which is shared between Editor and game, and the latter contains all the Editor-specific code, such as asset factories, asset tools, and the custom asset editor user interface.
The plug-in’s descriptor file should be self-explanatory. After a list of attributes that describes the plug-in itself, the Modules section lists the two modules along with their load types.
Note that the TextAssetEditor module has a dependency on the TextAsset module. This is because it needs access to the UTextAsset class in order to display and manipulate it. This is why we exported the asset type declaration using the TEXTASSET_API macro in the beginning of this tutorial.
Next Steps
This article discussed the implementation of new asset types, asset factories and asset actions. One thing we haven’t discussed yet is the creation of custom asset editors. This topic is more involved, and I will try to cover it in a future blog post.
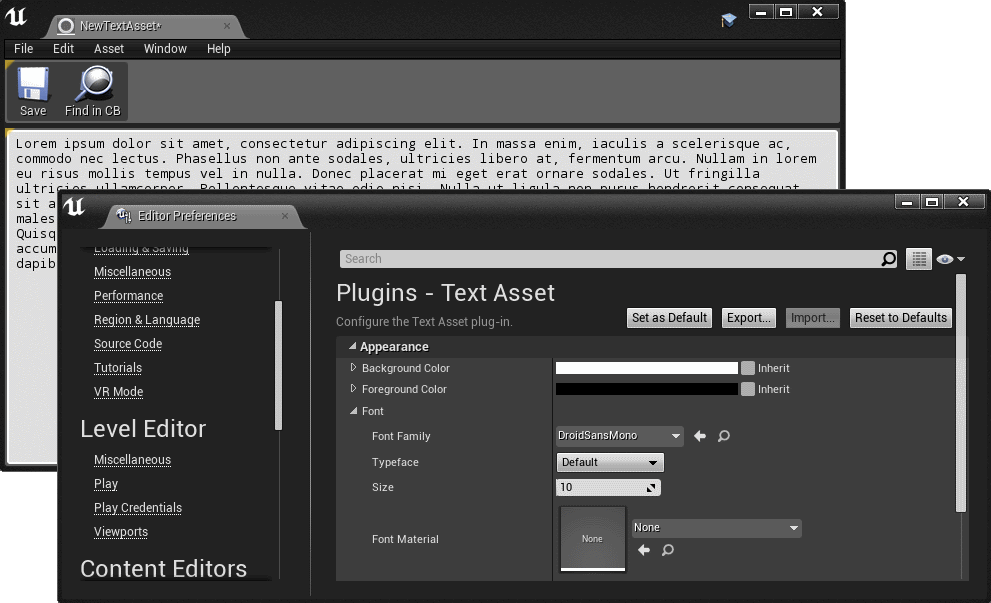
The TextAsset plug-in implements a simple asset editor that replaces the default Details Panel with a multi-line text editor. If you’re ready to explore it on your own, check out the code in the TextAssetEditor module. The main entry point is the FTextAssetEditorToolkit class.
The latest version even allows for customizing the text editor’s appearance in the Editor Preferences. Some more details can also be found in the FMX presentation linked below.
Related Resources
- Extending UE4 with Plug-ins (FMX 2017 Master Class slides)
- Plugins Programming Guide (unrealengine.com)
- Extending the Editor (an older training stream on YouTube)